


Chapitre 4 — La science de l'assemblage
Chapter 4 — The Science of Assembly: Initial Loading
L'assemblage d'une cartouche de précision est le point où la préparation théorique rencontre la réalité physique. Cette phase exige une transition des opérations « macro » (calibrage, ébarbage) vers les opérations « micro » (amorçage, pesée de poudre).
Amorçage : la fondation de l'allumage
L'importance du « toucher »
Les rechargeurs de précision préfèrent presque universellement les outils d'amorçage manuels (Sinclair, K&M) à ceux intégrés aux presses. Un outil manuel fournit un retour tactile direct : vous sentez l'amorce entrer dans le logement et le moment exact où elle touche le fond. Cela permet de détecter les logements devenus trop larges (signe de fatigue) ou les amorces légèrement déformées.
Précharge de l'enclume
Pour un allumage optimal, l'amorce doit être enfoncée assez profondément pour que l'enclume soit fermement en appui et légèrement préchargée contre la composition. Cela assure un transfert efficace de l'énergie du percuteur, au lieu de la gaspiller à finir d'enfoncer l'amorce.
Amorces Berdan et Boxer
Avant de détailler les types d'amorces par taille et intensité, une distinction plus fondamentale doit être comprise : les deux systèmes d'amorçage qui coexistent depuis le XIXe siècle.
L'amorce Boxer, inventée par le colonel Edward Boxer en 1866, est un ensemble autonome : la coupelle contient la composition d'amorçage et sa propre enclume. La douille possède un seul trou de flamme central, ce qui permet de retirer l'amorce usagée simplement en poussant une tige de décapsulage à travers ce trou — la pierre angulaire du rechargement moderne.
L'amorce Berdan, développée par le colonel Hiram Berdan à la même époque, adopte une approche différente : l'enclume fait partie intégrante de la douille, formée comme un plot central dans le logement. La coupelle ne contient que la composition. Deux (parfois trois) petits trous de flamme sont percés autour de l'enclume. L'absence de trou central rend le décapsulage difficile, et donc le rechargement peu pratique.
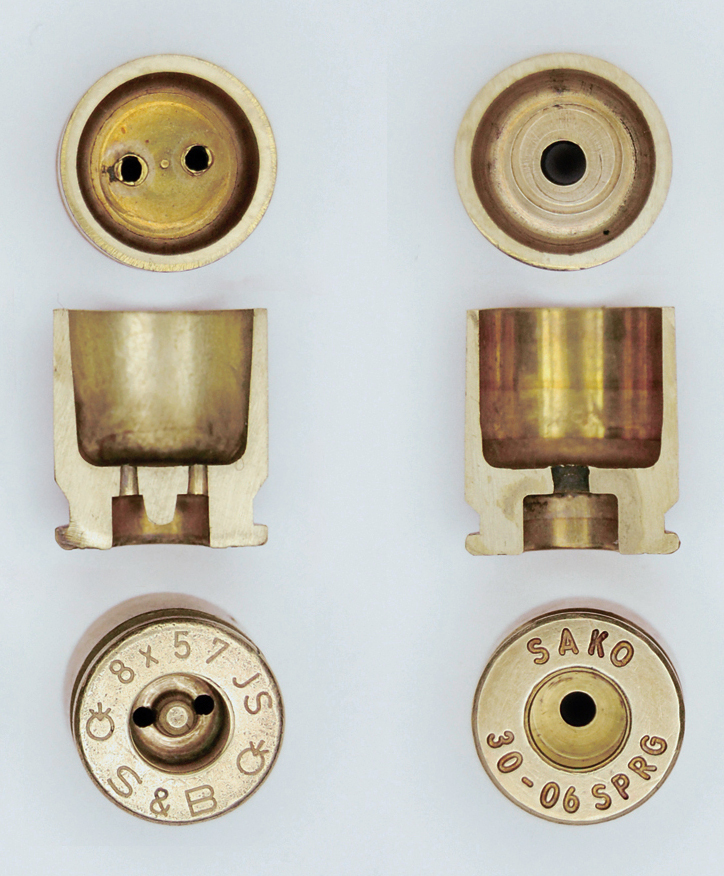
En pratique, les munitions à amorce Berdan se trouvent surtout dans les surplus militaires européens et certaines marques commerciales européennes, tandis que la quasi-totalité des douilles américaines utilisent le système Boxer. Pour le rechargeur, la distinction est capitale : seules les douilles à amorce Boxer sont pratiques à recharger. Lors de l'achat de douilles ou de surplus, vérifiez toujours le type d'amorçage. Une inspection visuelle du culot à la lampe révèle soit un trou central unique (Boxer), soit deux trous décalés autour d'un plot (Berdan). Dans ce manuel, toutes les procédures supposent des douilles Boxer sauf mention contraire.
Types d'amorces
- Standard : adaptées à la majorité des cartouches de précision à capacité modérée et poudres extrudées (bâtonnets).
- Magnum : flamme plus longue et plus chaude, pour les douilles à grande capacité ou les poudres sphériques.
- Match (compétition) : tolérances dimensionnelles plus serrées, poids de composition plus uniforme. Exemples : Federal 210M, CCI BR-2.
- Sans plomb : formulations au DDNP, de plus en plus viables pour la précision. Obligatoires dans certaines disciplines européennes.
Dosage de la poudre
La balance mécanique à fléau
La balance mécanique à fléau est l'instrument classique du rechargeur. Son principe est simple : la charge de poudre placée dans le plateau est équilibrée par des contrepoids coulissant sur une poutre graduée. Les modèles de qualité (RCBS 505, Redding N° 2, Hornady Balance) offrent une résolution de 0,1 grain et une précision de ± 0,1 grain. Un amortisseur magnétique accélère la stabilisation du fléau.
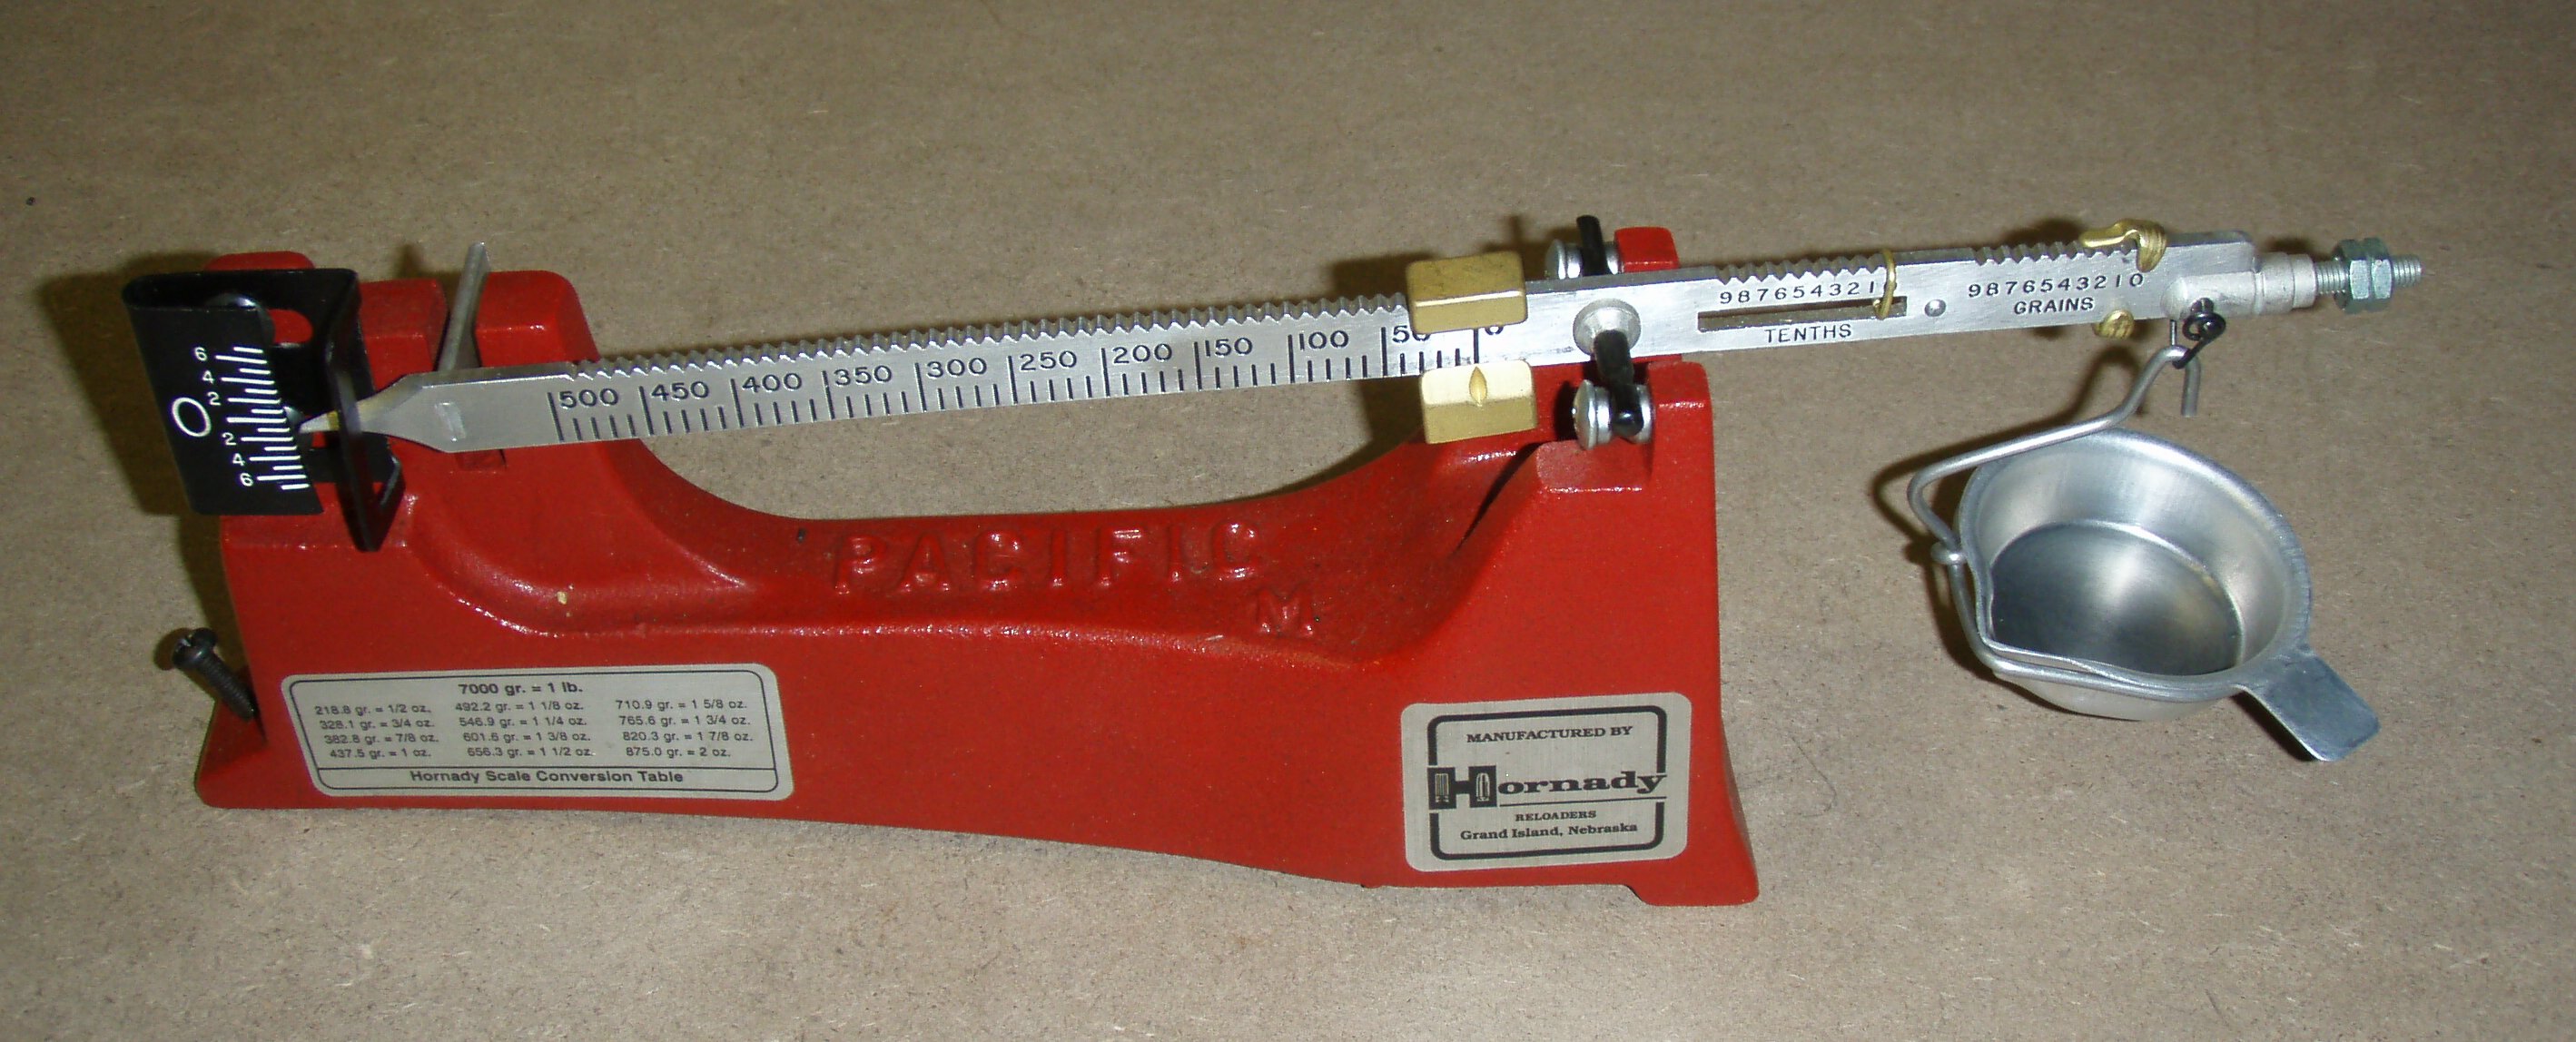
Les avantages décisifs de la balance à fléau : aucune source d'alimentation nécessaire, aucune dérive électronique, et une mesure de premier principe insensible aux interférences électromagnétiques. Même les rechargeurs équipés de balances électroniques conservent une balance à fléau comme outil de vérification indépendant. Sa limitation est la vitesse : le trickling manuel et l'attente de stabilisation du fléau ralentissent le rythme de chargement.
Balances électroniques et distributeurs automatisés
Les balances électroniques modernes (A&D FX-120i) ne reposent pas sur une simple jauge de contrainte. Leur capteur est hybride : il associe la restitution de force électromagnétique — qui apporte la résolution — à une structure de pesée à parallélogramme, qui apporte la rapidité de stabilisation. La distinction n'est pas de la pinaillerie : c'est la seconde moitié qui rend la balance utilisable à l'établi, là où une balance à restitution de force pure, de même résolution, est un instrument de laboratoire trop lent à se stabiliser pour suivre un doseur grain par grain. En mode grains, elle affiche par pas de 0,02 grain, cinq fois plus fin qu'une balance à fléau. Combinée à un distributeur automatisé (AutoTrickler), elle permet une consistance de ± 0,02 grain à raison d'une charge toutes les 15-20 secondes.
Ce que cette régularité vaut en vitesse est chiffré au chapitre 2 : environ 1,4 fps sur un étui de capacité courante, contre 7 fps environ pour une balance à fléau tenue au dixième de grain.
En contrepartie, les balances électroniques sont sensibles à la dérive thermique, aux interférences électromagnétiques (moteurs, néons), aux courants d'air et à l'électricité statique. Vérifiez-les avec des poids étalons en début de séance et contrôlez les charges à la balance à fléau tous les 10 à 20 coups.
Gestion des lots de poudre
Le changement de lot est l'une des causes les plus courantes de décalage de vitesse inexplicable. Lors du passage à un nouveau lot :
- Réduisez votre charge actuelle de 2-3 %.
- Revérifiez la vitesse au chronographe.
- Remontez progressivement vers votre vitesse cible en surveillant les signes de pression.
Mise en place du projectile
Déterminer le contact avec les rayures (lands)
Chaque chambre a un point spécifique où l'ogive du projectile entre en contact avec les rayures. Ce point change au fil de la vie du canon (érosion du forcement). Utilisez un outil comme le Hornady O.A.L. Gauge pour trouver ce point zéro — la base de tous vos expériences de profondeur.
Profondeur et pression
Enfoncer le projectile davantage (augmenter le « jump ») diminue généralement la pression de crête. Inversement, enfoncer le projectile dans les rayures (jump négatif) peut augmenter significativement la pression et ne doit être tenté que par des rechargeurs expérimentés.
Paramètres critiques d'assemblage
| Opération | Spécification cible | Outil de vérification |
|---|---|---|
| Profondeur d'amorce | 0,08-0,13 mm sous la surface | Micromètre de profondeur / toucher |
| Poids de poudre | ± 0,02 grain | Balance EMFR (A&D FX-120i) |
| Profondeur de balle | ± 0,025 mm (à l'ogive) | Comparateur + pied à coulisse |
| Concentricité | < 0,05 mm de faux-rond | Jauge de concentricité |
The assembly of a precision cartridge is where the theoretical preparation of your components meets the physical reality of the firearm. This phase requires a transition from the "macro" operations of sizing and trimming to the "micro" operations of seating primers and weighing powder charges. In this chapter, we discuss the methodologies required to ensure that every round produced is a near-perfect clone of its neighbors, with a particular emphasis on the tactile feedback and measurement techniques that define the expert reloader.
Primer Seating: The Foundation of Ignition
Seating a primer is often underestimated as a simple mechanical task, but it is actually a delicate operation that dictates the consistency of ignition. The goal is to seat the primer until it firmly "bottoms out" in the uniformed primer pocket, ensuring the anvil is properly compressed against the priming compound.
The Importance of "Feel"
Precision reloaders almost universally prefer handheld priming tools (such as those from Sinclair or K&M) over the built-in priming systems on presses. A handheld tool provides direct tactile feedback. You can "feel" the primer as it enters the pocket and exactly when it makes contact with the floor. This allows you to detect pockets that are becoming too loose (a sign of high-pressure brass fatigue) or primers that are slightly out of round.
Crushing the Anvil: The Pre-Load
For optimal ignition, the primer must be seated deep enough that the anvil is firmly bottomed and slightly pre-loaded against the priming compound. Two different quantities are easily confused here. What you measure is the cup’s depth below the case head—the specification is 0.003” to 0.005” (0.076–0.127 mm), and that is what a depth micrometer reads. What you achieve is a crush of the anvil past its first contact with the pocket floor, of the order of a couple of thousandths. The two happen to be of similar magnitude, which is precisely why they get conflated; only the first is measurable on a finished round. This ensures that when the firing pin strikes, the energy is efficiently transferred into the priming compound rather than being wasted by pushing the primer further into the pocket. A primer that is not fully seated (one that protrudes above the case head) is both an accuracy problem and a safety hazard: it can cause a slam-fire in semi-automatic actions, and the inconsistent ignition will produce erratic velocities.
Berdan versus Boxer Primers
Before discussing primer types by size and intensity, a more fundamental distinction must be understood: the two competing primer systems that have coexisted since the 19th century.
The Boxer primer, invented by Colonel Edward Boxer of the Royal Arsenal in 1866, is a self-contained unit: the primer cup holds the priming compound and its own anvil. The cartridge case has a single, central flash hole through which the flame passes to ignite the propellant. This design makes the spent primer easy to remove with a simple decapping pin pushed through the flash hole from inside the case—the cornerstone of modern handloading.
The Berdan primer, developed by Colonel Hiram Berdan of the United States Army around the same time, takes a different approach: the anvil is an integral part of the cartridge case itself, formed as a raised post in the center of the primer pocket. The primer cup contains only the priming compound and sits over this built-in anvil. Two (or sometimes three) small flash holes are drilled around the anvil to convey the flame to the powder charge. Because there is no central hole, the Berdan primer cannot be pushed out with a decapping pin, making depriming and reloading difficult.
In practice, Berdan-primed ammunition is common in European military surplus and some commercial European brands, while virtually all American-made brass uses the Boxer system. For the handloader, this distinction is critical: only Boxer-primed cases are practical to reload. When purchasing brass or surplus ammunition for reloading, always verify that it uses Boxer primers. A quick visual inspection of the case head with a flashlight will reveal either a single central flash hole (Boxer) or two offset holes around a central post (Berdan). Throughout this manual, all procedures assume Boxer-primed cases unless explicitly stated otherwise.
Primer Selection: Types and Applications
The choice of primer is often overlooked, yet it profoundly influences ignition consistency. Primers are classified by size (small and large), by type (rifle and pistol), and by intensity (standard and magnum). Understanding these distinctions is essential for building safe, accurate ammunition.
Standard primers are appropriate for the majority of precision rifle cartridges with moderate case capacities and extruded (stick) powders. Magnum primers produce a longer, hotter flame and are intended for use with large-capacity cases or ball (spherical) powders that are more difficult to ignite consistently. Using a magnum primer in a small-capacity case loaded with an easily ignited extruded powder can increase pressures beyond safe limits, so the primer type must always be matched to the specific cartridge and propellant combination. More generally, because primers vary in brisance and compound weight—even between brands of the same size and type—any change of primer brand, type, or intensity alters the pressure curve: treat it as a new load, backing the charge off by roughly 5% and working back up over the chronograph. And never substitute a pistol primer for a rifle primer: although the small and large sizes share the same cup diameters (0.175” and 0.210” respectively), the pistol cup is thinner and softer, and at rifle pressures it can be pierced by the firing pin, venting hot gas toward the shooter.
For the precision reloader, match-grade primers offer a measurable advantage. Manufacturers such as Federal (the Gold Medal 210M for large rifle and 205M for small rifle) and CCI (the BR-2 and BR-4) produce primers with tighter dimensional tolerances, more consistent priming compound weights, and more uniform anvil geometry than their standard counterparts. The practical result is a reduction in the velocity standard deviation of the finished ammunition—a difference that becomes significant at long range.
Driven by environmental regulations and health concerns, lead-free primers using compounds such as diazodinitrophenol (DDNP) are becoming increasingly available. Modern lead-free formulations from CCI and Federal have reached a level of consistency that makes them viable even for precision applications, and in some European countries they are already mandatory for certain shooting disciplines.
Their ignition characteristics do differ from lead styphnate, however, and in one respect the difference matters for safety rather than for accuracy. Comparative testing of lead-free primers has recorded a perceptible interval between firing-pin strike and ignition across a majority of shots in a test string, together with an outright misfire; performance also degraded more sharply than styphnate primers after conditioning in heat and humidity. That interval is the definition of a hangfire. The practical consequence is unchanged from any other suspected misfire, but it deserves restating because these primers make the case less rare: keep the rifle pointed downrange and wait at least thirty seconds before opening the bolt. Lots stored in a damp environment warrant particular care.
Propellant Handling: Beyond the Volume
In precision reloading, we have moved beyond "throwing" charges by volume. While high-quality mechanical measures are still useful for bulk loading or field work, the pursuit of extreme accuracy requires kernel-level consistency in every charge.
The Modern Standard: A Hybrid Sensor
Modern electronic scales, such as the A&D FX-120i, do not rely on a strain gauge alone. Their sensor is a hybrid: it combines magnetic force restoration—which supplies the resolution—with a parallelogram load-cell structure that supplies the settling speed. The distinction is not pedantry, because the second half is what makes the scale usable at the bench: a pure force-restoration balance of the same resolution is a laboratory instrument that settles too slowly to follow a trickler kernel by kernel. In grain mode such a scale displays in steps of 0.02 grains—enough to see a single kernel of extruded powder land in the pan. Paired with an automated dispenser like the AutoTrickler, it delivers weight consistency that was previously available only in laboratories.
What that consistency is worth in velocity is quantified in Chapter [ch:tools]: about 1.4 fps in a case of ordinary capacity, against roughly 7 fps for a beam scale held to a tenth of a grain.
Powder Lot Management
One of the most common causes of unexplained velocity shifts is a change in powder lot. Manufacturers work hard to maintain consistency, but variations in burn rate are inevitable. When switching to a new lot of powder:
Reduce your current load by 2-3%.
Re-verify your velocity across a chronograph.
Incrementally work back up to your target velocity, watching for pressure signs.
Bullet Seating: The Final Interface
The seating operation is the final act of assembly. It determines the "jump"—the distance the bullet must travel before it engages the rifling.
Determining the Lands
Every rifle chamber has a specific point where the bullet ogive will contact the rifling (the "lands"). This point changes over the life of the barrel as the throat erodes. Using a tool like the Hornady O.A.L. Gauge, you must find this zero-point for every bullet type you use. This measurement serves as the baseline for all your seating depth experiments.
Seating Depth and Pressure
Seating a bullet deeper (increasing the jump) typically decreases peak pressure, as the bullet has more space to begin moving before it meets the resistance of the rifling. Conversely, seating a bullet "into the lands" (negative jump) can significantly increase pressure and should only be attempted by experienced reloaders who have carefully worked up their loads.
| Operation | Target Specification | Verification Tool |
|---|---|---|
| Primer Depth | 0.003” to 0.005” (sub-flush) | Depth Micrometer / Tactile Feel |
| Powder Weight | +/- 0.02 grains | MFR Scale (e.g., A&D FX-120i) |
| Seating Depth | +/- 0.001” (to ogive) | Bullet Comparator + Calipers |
| Concentricity | < 0.002” Runout | Concentricity Gauge |
Reflection: As noted in the Sinclair Handbook, "the primer is the heart of the cartridge." If the foundation of ignition is inconsistent, no amount of precision in other areas can compensate for the resulting variance in velocity and accuracy. Treat every step of assembly with the same level of discipline.